


Thirdweb
621 days ago
Enable Gasless Transactions For Your dApp With Gelato Relay!
 This is an updated version of a developer tutorial that was originally posted on Thirdweb.
TL;DR:
This guide will walk you through the development of a gasless application by leveraging the Gelato Relay SDK and Thirdweb's React SDK. We'll be crafting two React components named CounterApp and GaslessNFTApp. The purpose of these components is to allow users to either increment a counter value stored in the smart contract or mint an NFT to their address without paying gas fees for the transaction
Navigating the world of Web3 can be daunting for newcomers, primarily because of the "gas" fee system. Every transaction on networks like Ethereum incurs a fee, known as gas. While this gas fee protects the network from malicious attacks, it also complicates the onboarding process.
For new users to onboard onto a blockchain ecosystem, they must open an account with a centralized exchange, undergo KYC, purchase crypto using fiat, transfer that crypto to their wallet, and then use it to interact with decentralized applications.
This is where Gelato Relay comes in. It offers a solution to make this process smoother, eliminating the need for users to buy a native token to execute a transaction. In this guide, we'll use the Gelato Relay SDK alongside the 1Balance payment system, allowing you to sponsor transactions for users so they don't have to worry about gas. This feature is available on all networks Gelato supports. This demo app will utilize Thirdweb's React SDK for wallet connections, pulling information from on-chain, and for NFT contract deployment using the standard "NFTDrop" template contract.
Initialization & Dependency Installation
Step 1: Set up the project and install dependencies Clone the project from GitHub:
git clone https://github.com/gelatodigital/gelato-thirdweb-relay
Change to the project directory and install the necessary dependencies:
cd gelato-thirdweb-relay
npm install
Step 2: Run the project and try it out in your browser
npm start
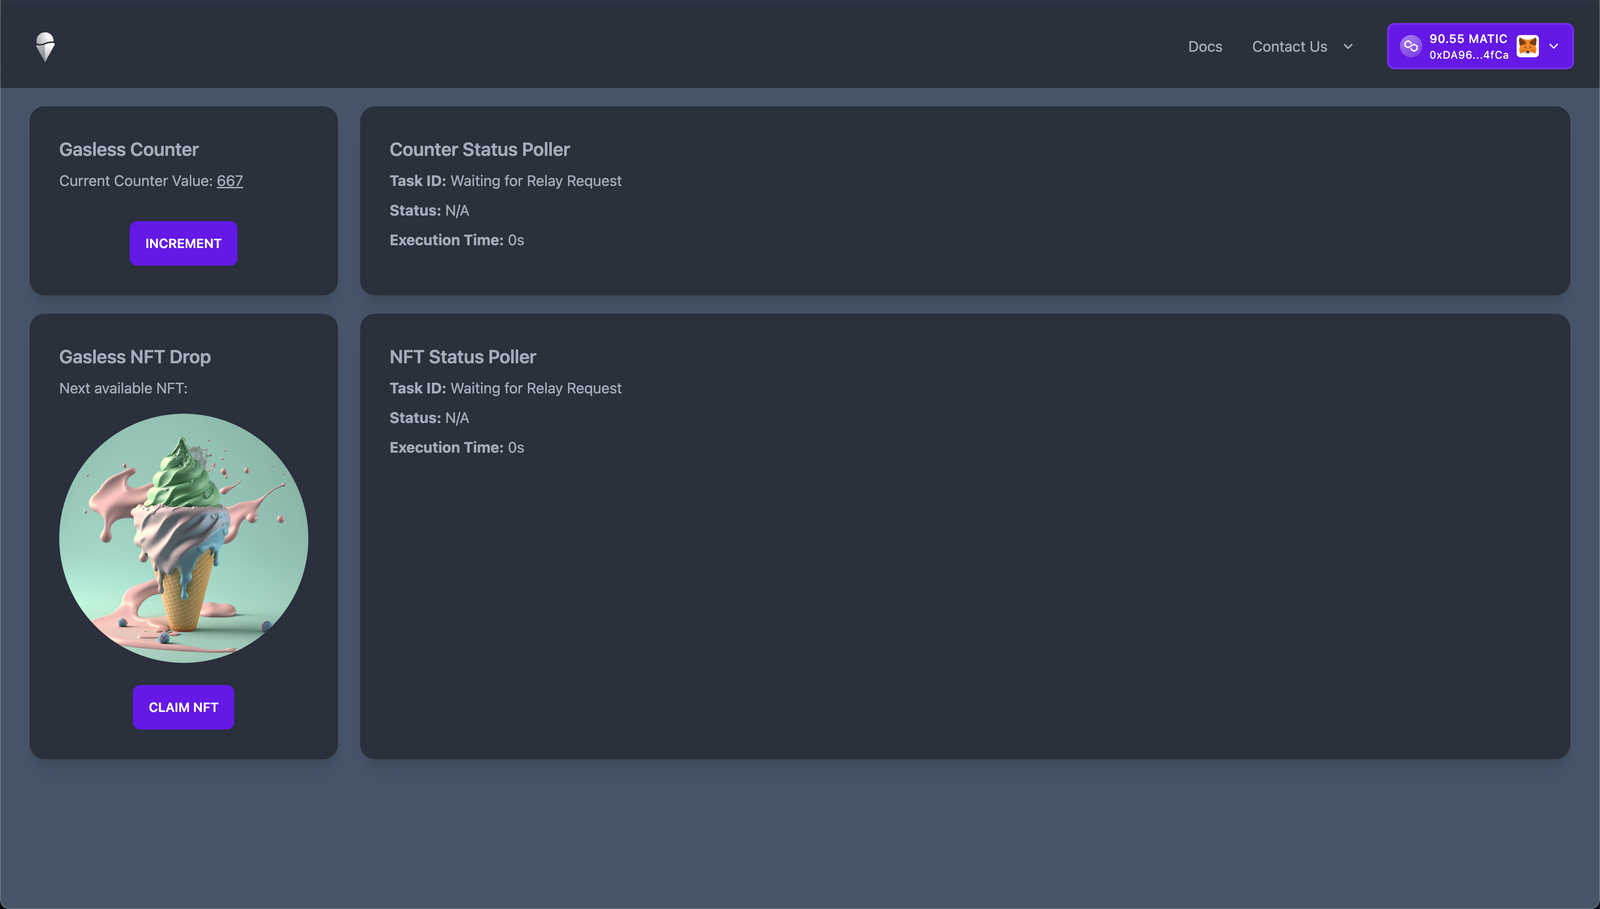
If you navigate over to http://localhost:3000/ in your browser, you should see the following:
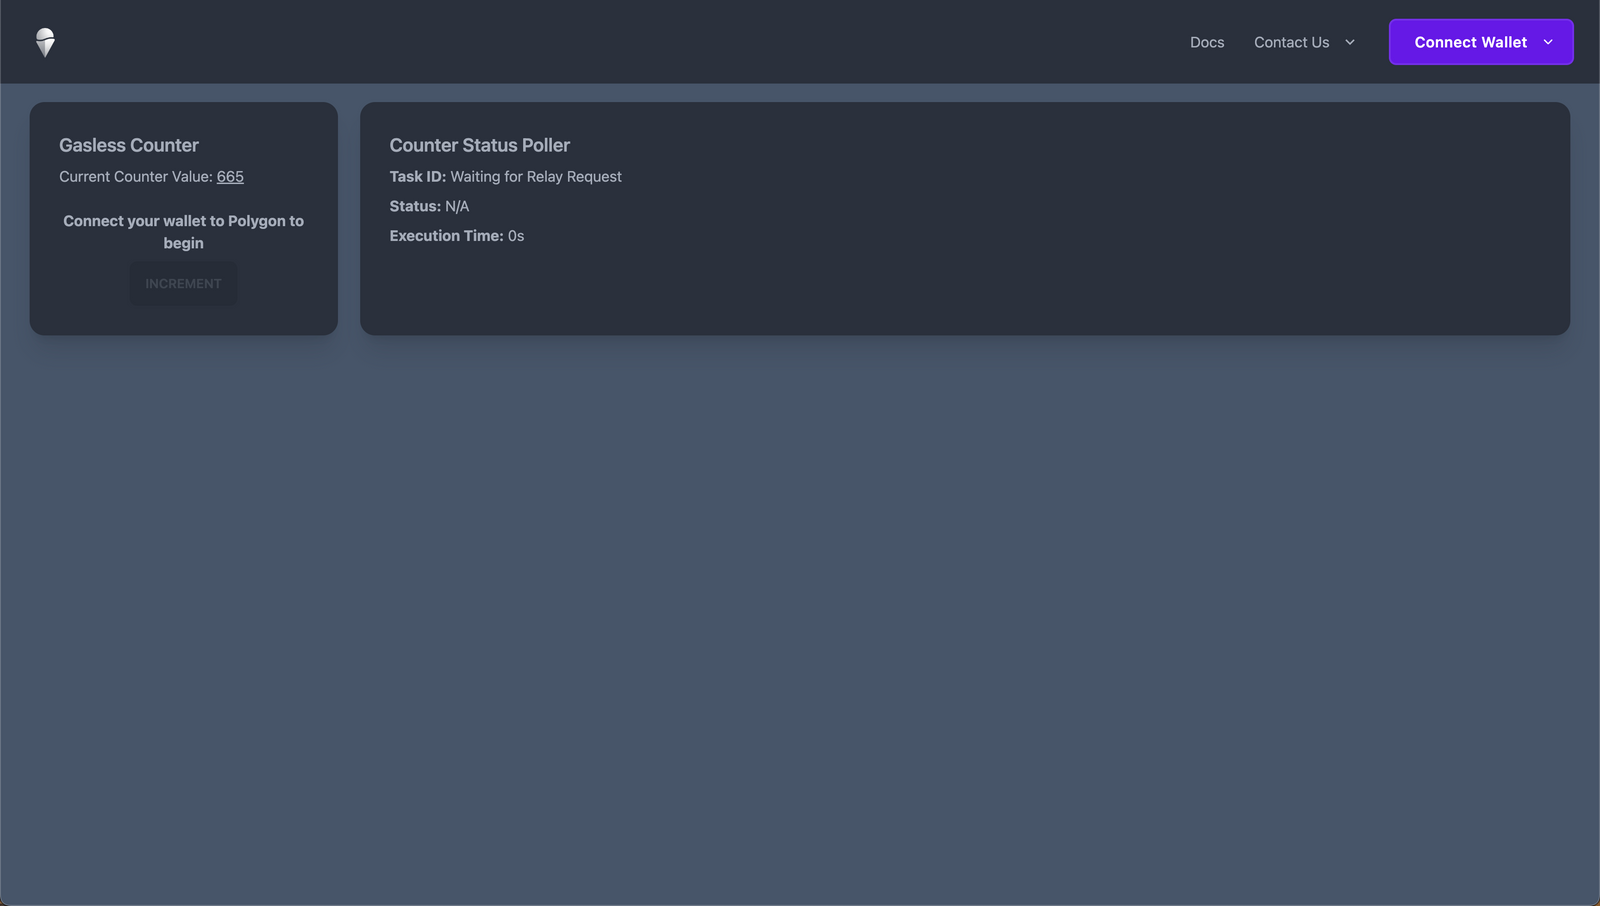
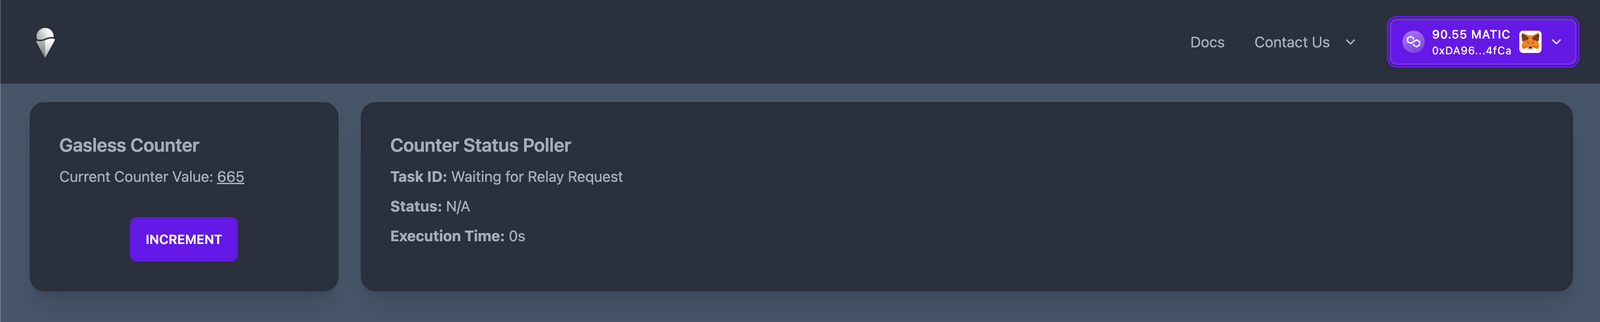
Step 3: Connect your wallet, and connect to Polygon mainnet
Connect your wallet with Thirdweb's "Connect Wallet" button in the top right.
Once you click the "increment" button, you'll notice some details popping up from Gelato Relay's Status API. When you submit a request to our relayer, we designate this as a Task ID, pending through our task queue. You can use the status API to check its progress and get information on its execution.
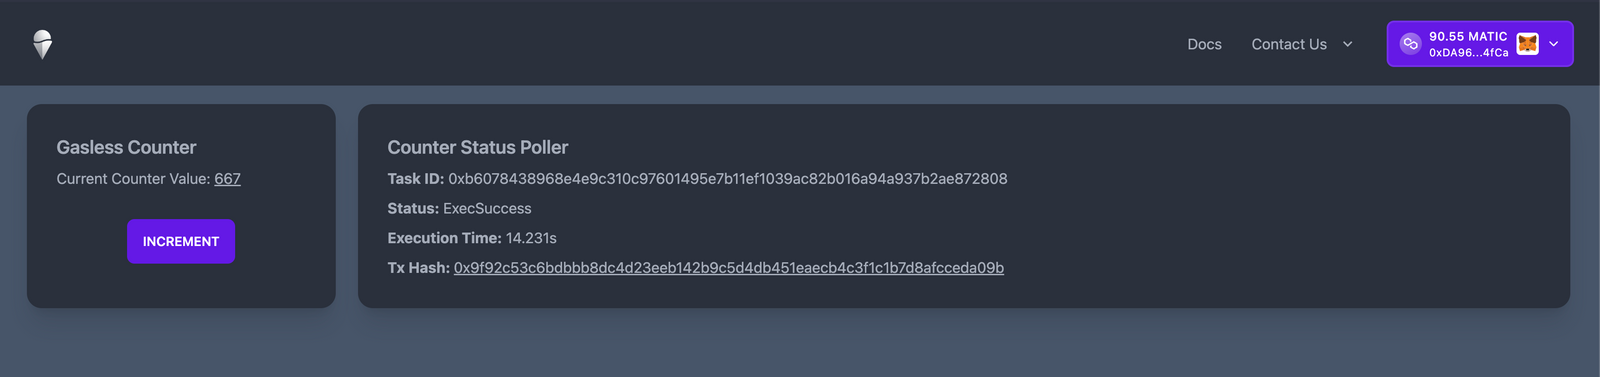
Did you notice that you didn't have to sign any transaction or pay for gas at all, and yet you just interacted with and updated the state on the blockchain? That's a gasless transaction - let's look into how exactly this works.
Behind the Scenes
Wondering what just happened? Let's peek under the hood by exploring the code in src/components/CounterApp.tsx.
In the code, there's a function named sendRelayRequest:
  const sendRelayRequest = async () => {
    // update state
    setInitiated(true);
    setPopup(false);
    setTaskId("");
    setTxHash("");
    setStartTime(0);
    setTaskStatus("Loading...");

    // instantiating Gelato Relay SDK
    const relay = new GelatoRelay();

    // connecting to contract through front-end provider
    const provider = new ethers.providers.Web3Provider(window.ethereum);
    const signer = provider.getSigner();
    const contract = new ethers.Contract(target, counterABI.abi, signer);

    // relay request parameters
    const feeToken = "0xEeeeeEeeeEeEeeEeEeEeeEEEeeeeEeeeeeeeEEeE";
    const { data } = await contract.populateTransaction.increment();

    if (!props.chainId || !data) return;

    const request: CallWithSyncFeeRequest = {
      chainId,
      target,
      data,
      feeToken,
      isRelayContext: true,
    };

    const relayResponse = await relay.callWithSyncFee(request);
    setTaskId(relayResponse.taskId);
    setStartTime(Date.now());
  };
The line const relay = new GelatoRelay(); creates a new instance of the GelatoRelay class from the Gelato Relay SDK. The Gelato Relay SDK provides a simple way to interact with the Gelato Relay service, which enables gasless transactions on supported networks like Polygon.
We still have to connect to the blockchain via your frontend wallet in order to pull information from chain such as the counter value, and also retrieve the counter smart contract's ABI.
 const provider = new ethers.providers.Web3Provider(window.ethereum);
  const signer = provider.getSigner();
  const contract = new ethers.Contract(target, counterABI.abi, signer);
We need the ABI to generate the "payload" telling Gelato Relay which function to call on the target smart contract, and with what arguments:
const { data } = await contract.populateTransaction.increment();
Once we have the payload with data, we can build a simple sponsored relay request:

const request: CallWithSyncFeeRequest = {
    chainId,
    target,
    data,
    feeToken,
    isRelayContext: true,
};
This snippet is a CallWithSyncFeeRequest, allowing the target smart contract to pay for and sponsor the gas in various tokens. You can read more about callWithSyncFee here. Thirdweb provides hooks such as useChainId() to automatically grab the chainID from the connected wallet so that it is fetched automatically on line 12.
To link the sendRelayRequest function to the increment button, we add an onClick parameter to the displayed button:
<button onClick={sendRelayRequest}>
Sponsor Transaction using 1Balance
Want to cover transaction costs for all your users on every supported network using just one API key? Let's see how:
Using 1Balance for Sponsorship
-
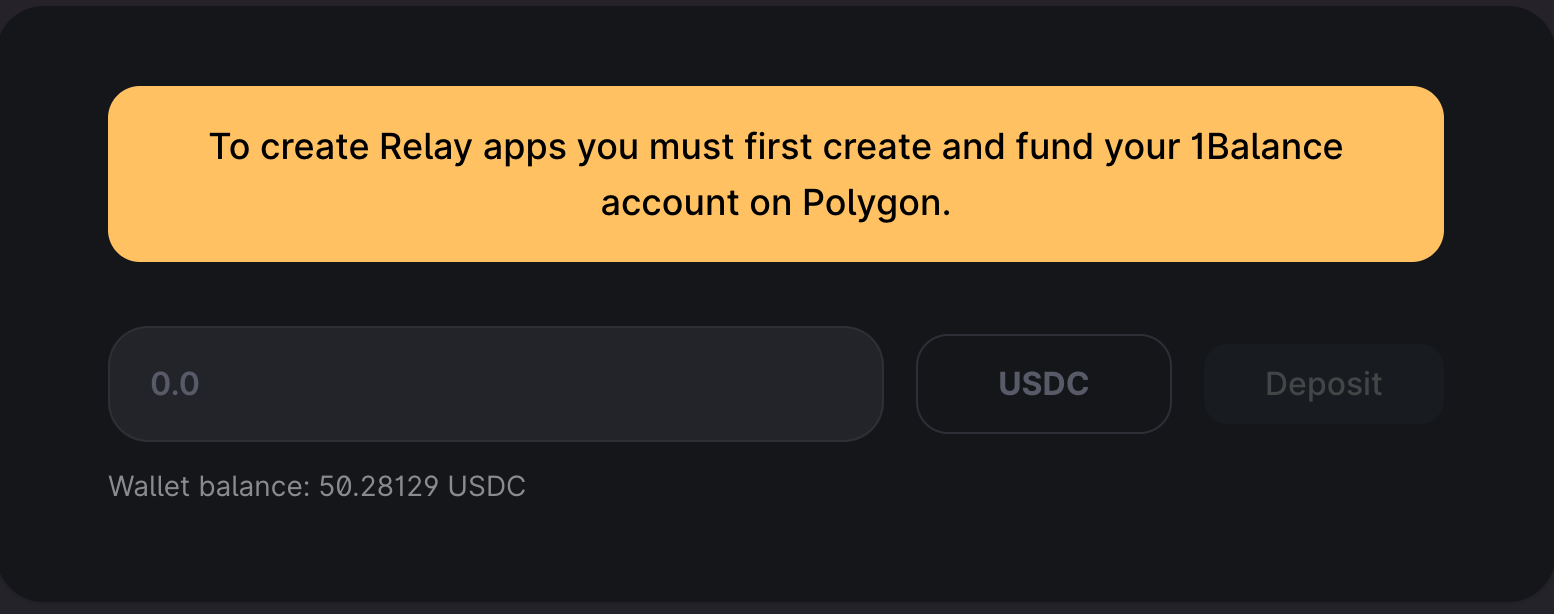
Start by visiting https://relay.gelato.network. When you connect your wallet there, a dashboard will pop up.
-
Click on "1Balance login." This lets you sign in with your wallet. It's a safe step only for verifying who you are, without doing anything on the blockchain.
-
Once logged in, you can deposit funds used to subsidize the gas costs for any transactions you request via Gelato Relay. Gelato also takes a small fee on top of gas, which you can read more about in the Gelato documentation.
-
For sponsoring transactions on the main networks like Ethereum, Polygon, and others, your 1Balance should have USDC and be on the Polygon network. Once you deposit USDC, this new balance will be used across all your transactions across all Gelato-supported networks. So, you don't have to juggle balances on different networks.
-
If you're feeling cautious and want a trial run before the real deal, click on "Testnets." Here, you can deposit some 'test' Ethereum (gETH) on Goerli. This will let you cover costs for test transactions on networks like Goerli, Optimism Goerli, and others.
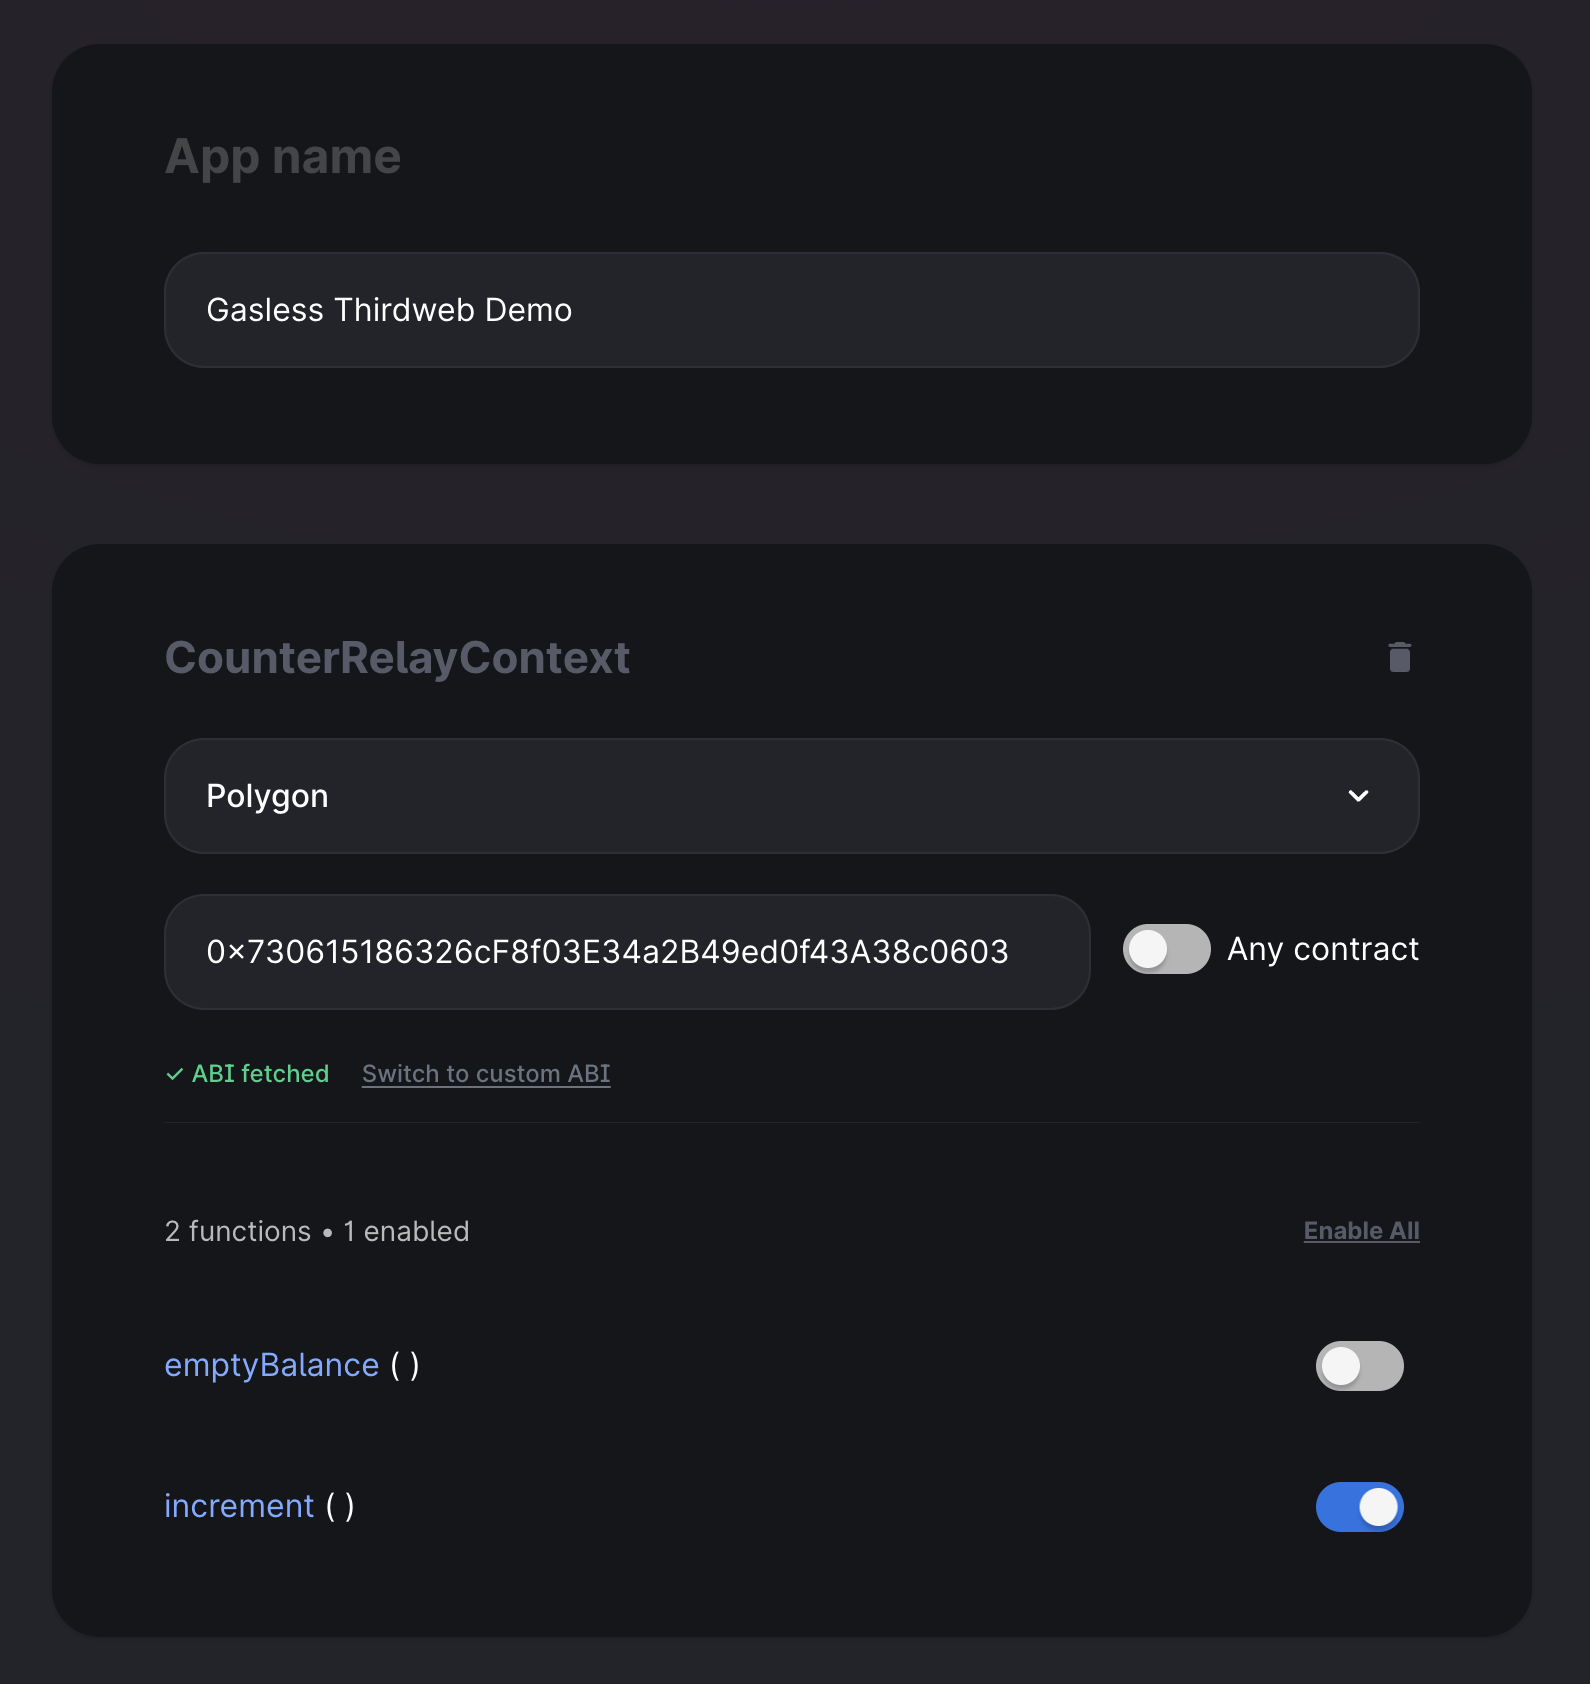
Now, for the relay to work with your desired contract, input your contract address (or use the demo counter contract on Polygon at 0x730615186326cF8f03E34a2B49ed0f43A38c0603 and network and enable the functions you want to call using Gelato Relay. You can also allow any contract on that network by hitting the "Any Contract" toggle.
Once you create your app, you can grab your API key. With the API key, you can now change the request code in the sendRelayRequest function like the snippets below
First, build the struct for the SponsoredCallRequest:
const request: SponsoredCallRequest = {
    chainId,
    target,
    data,
};
Then you can modify the relay request itself to:
const relayResponse = await relay.sponsoredCall(request, apiKey);
Remember that API keys can be leaked from the front end. For demo purposes, this is indicative of an example demo hosted locally. To keep your API key secret while using it in your front end, create a backend server that acts as a proxy between your front end and the API provider. This way, the API key remains hidden from the frontend code, and only the server can access it.
Now we can build our app.
How to Build Your dApp
Using React, making a new component is a breeze. You can easily craft your own by copying the CounterApp.tsx file and adjusting it. But for this guide, we'll dive into the GaslessNFTApp.tsx, found in the example repository.
GaslessNFTApp.tsx uses a different modality of payment where the user signs a message to confirm they want a transaction to come through. This practice follows the ERC-2771 standard; you can read more about it in Gelato's documentation.
Let's start by enabling this app in the AppContainer.tsx file located in components.
import CounterApp from "./apps/CounterApp";
// import GaslessNFTApp from "./apps/GaslessNFTApp";

const AppContainer = () => {
  return (
    <div>
      <CounterApp />
      {/* <GaslessNFTApp /> */}
    </div>
  );
};

export default AppContainer;
Next, uncomment line 2 and line 8 to activate the GaslessNFTApp in the front end. Now, if you are still running the development server, you can navigate to http://localhost:3000/ and see the new app (otherwise, run npm start again).
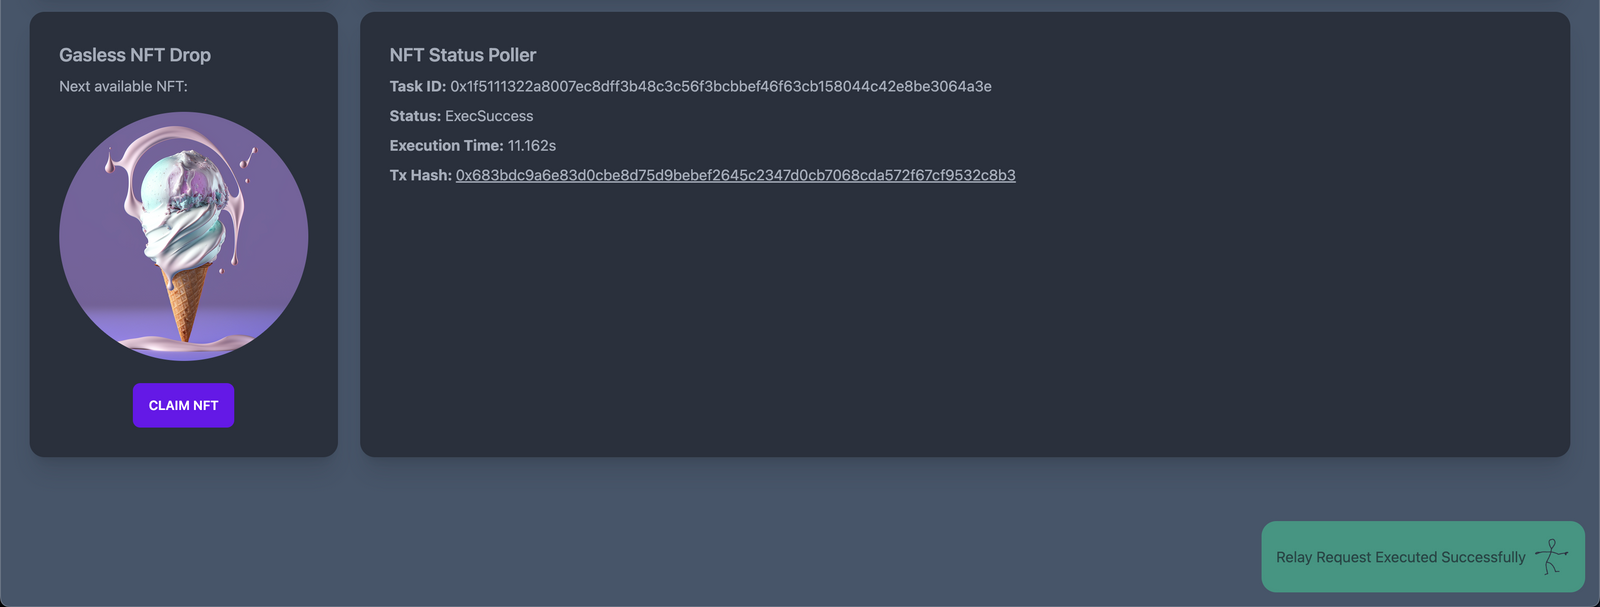
The Gasless NFT App has been added below. If you click "Click NFT," nothing will happen yet, as you need to add a target contract address and a 1Balance sponsor API key. If you'd like to use the demo NFT smart contract on Polygon, please use the address 0x730615186326cF8f03E34a2B49ed0f43A38c0603.
Otherwise, read below to see how to deploy your NFT contract using Thirdweb.
Deploy your contract with Thirdweb
This NFT mint is gasless, and the NFT contract is deployed using Thirdweb's dashboard using the template contract "NFTDrop" found here. Thirdweb makes it super easy to deploy an NFT contract and edit claim conditions, prices, and more. You can read a complete guide for deploying this NFT contract via Thirdweb's Deploy an ERC721A NFT Smart Contract guide.
The most important part of setting up is the claim conditions post-deployment:
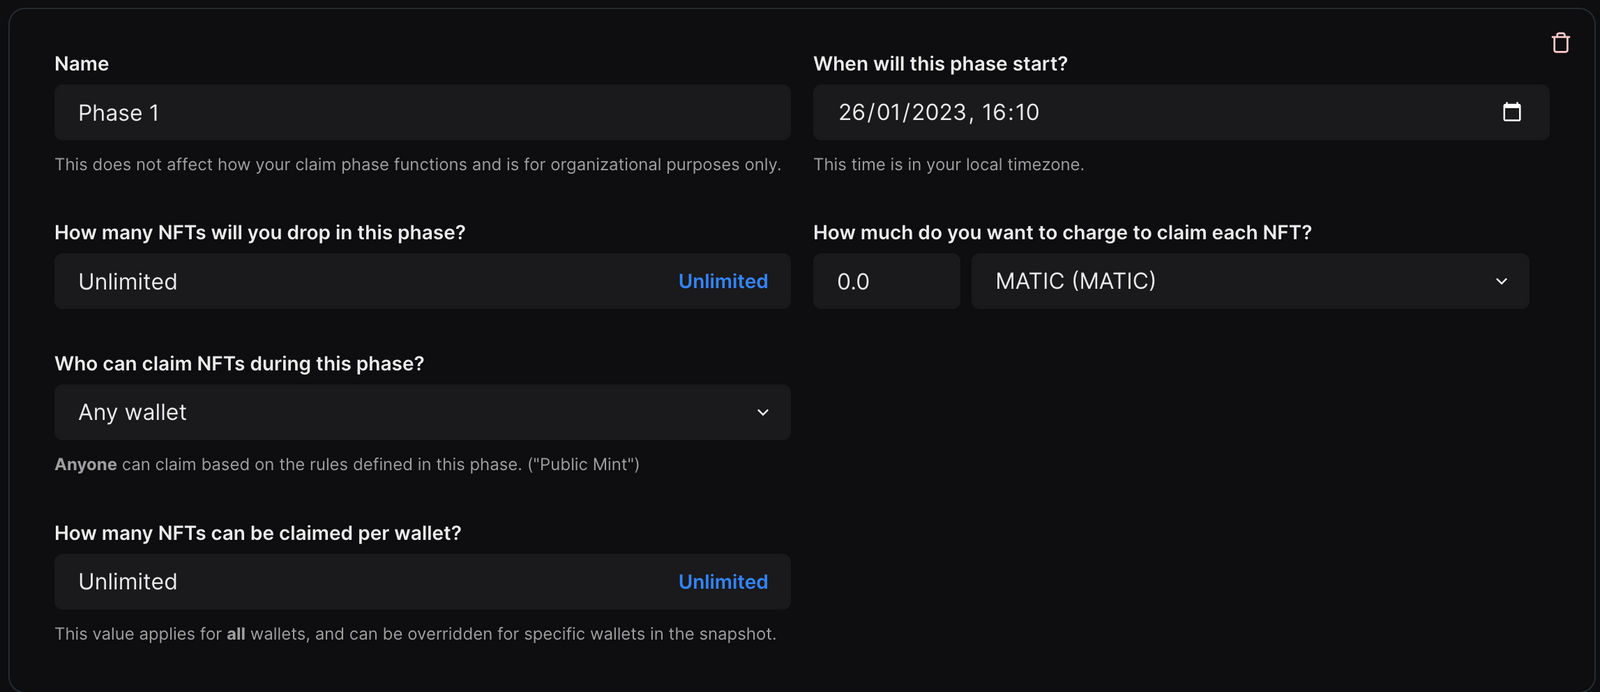
For this demo, the NFTs are free and unlimited (though in practice, there are only 20 different pictures uploaded for the actual NFTs themselves).
Once deployed, grab the contract address and paste it into line 20 on GaslessNFTApp.tsx in the target variable:
const target = "PASTE_CONTRACT_ADDRESS_HERE"
Thirdweb makes it super easy to connect to a contract and pull out data from that contract:
  // contract object instantiate
  const { contract, isLoading } = useContract(target, "nft-drop");
  const { data: nfts, refetch } = useNFTs(contract, { start: 0, count: 20 });
Importing an ABI here is unnecessary because Thirdweb handles ABI management for you. Furthermore, Thirdweb's React SDK gives custom hooks like useNFTs which is a hook to query all NFTs associated with a smart contract. This process is all done in one line of code, saving so much time and headaches associated with querying.
Next up, paste your generated 1Balance sponsor API key into line 79:
const sponsorAPIkey = "PASTE_SPONSOR_API_KEY_HERE";
Once both are ready, you can head to the front end and click "Claim NFT" Your NFT will be minted and sent to the wallet connected, all without gas.
Conclusion
You've learned how to make an app that offers gas-free actions. With CounterApp, users can effortlessly increase a value without facing gas charges, whereas GaslessNFTApp allows them to mint NFTs free of transaction fees. This is made possible using Gelato Relay's tools and Gelato 1Balance. All of this is easier and faster thanks to Thirdweb's React SDK to connect and pull data from smart contracts very quickly and efficiently within React-based front ends.
About Gelato
Gelato is web3’s decentralized backend empowering builders to create augmented smart contracts that are automated, gasless & off-chain aware on all major EVM-compatible blockchains including Ethereum, Arbitrum, Polygon, Optimism, zkSync, and many more. Over 400+ web3 projects rely on Gelato for years to power the execution of millions of transactions across DeFi, NFT, and Gaming.
Gelato currently offers four services:
-
Web3 Functions: Connect your smart contracts to off-chain data & computation by running decentralized cloud functions.
-
Automate: Automate your smart contracts by executing transactions automatically in a reliable, developer-friendly & decentralized manner
-
Relay: Give your users access to reliable, robust, and scalable gasless transactions via a simple-to-use API
-
Gasless Wallet: A powerful SDK that enables developers to provide a world-class UX by combining Gelato Relay + Safe's Smart Contract Wallet, enabling Account Abstraction
Subscribe to our newsletter and turn-on your Twitter notifications to get the most recent updates about the Gelato ecosystem!
If you are interested in being part of Gelato team and build the future of the internet browse the open positions and apply here.
Thirdweb